 |

11. A few more settings
With these setting we will define where our MP3's will be stored prior to burning and what their titles look like on screen.
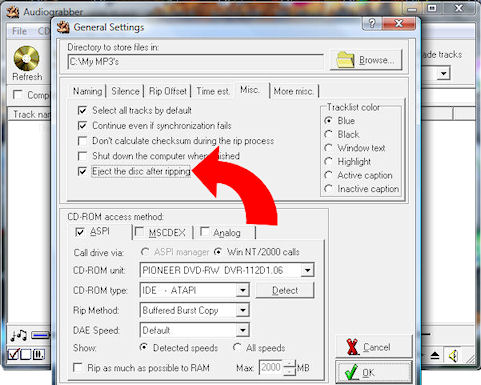
Click on the settings button to access to the general settings menu.

12. Where to store your MP3's.
Select the location for storing your MP3 collection. It's easy to leave this setting as default and hve all your files end up in the c:/audiograbber folder, but often this gets overlooked until you come to burn them to disc and forget where they are !.
This is why we set up our MP3 folder before hand, this way we can collate our tracks all together in one 'easy to find' location and secondly easily delete them to make space for our next batch.
1. Select the 'Browse' button.
2. Locate the 'My MP3's' directory - This should be found by going to the 'C:/' directory.
3. Select the folder and click OK.
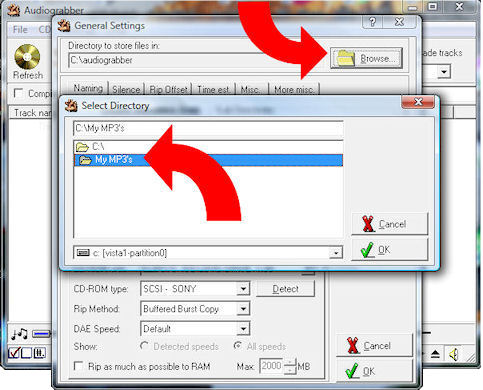
Directory browser.
13. How do you want your MP3's displayed?
Audiograbber can save the files ripped from the audio CD in a variety of styles, some good, some are downright confussing.
I would expect that most people would want to see the name of the track (in full) and the album it came from.
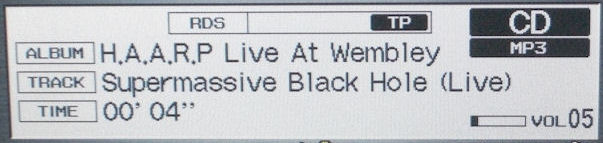
SatNav display.
This sounds simple, but we also need to take into account the directory structure, how the folders are displayed in the lower section of the Satnav browsing screen.
If we select the wrong choices on the next menu, we could have the SatNav displaying track number, artist, and a whole host of other information, worse still, we'd know who the artist was, what album we were playing, but no room for the track name !.
You are free to experiment will any of the menu selections but I found these settings gave the optimum display with an 'easy to find' track structure.
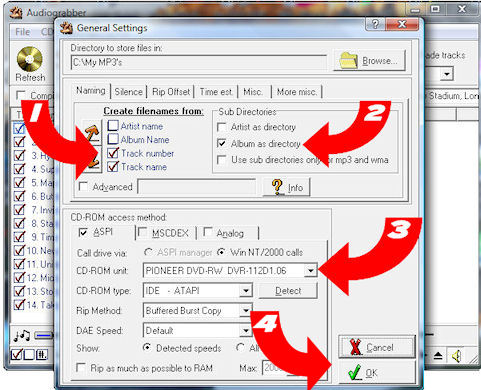
Note that Audiograbber will automatically get the artist, album and track names - We are selecting what we want to do with them when they are written to the MP3 file.
1a. Create filenames from the track number - This will give us '01 - my track.mp3'
1b. Create filenames from the track number - This will give us '01 - Supermassive Black hole.mp3'
2. Set album as directory - This will create te folder 'c:/My MP3's/H.A.A.R.P Live at Wembley'
3. Select your CD drive for loading your CD's - Some PC's have more than one CD player.
4. And click OK.
Here are a few images that show the difference from selecting the artist name or not (in our case) in the previous settings.
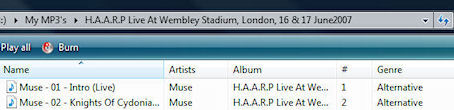
Artists name added to the selection.
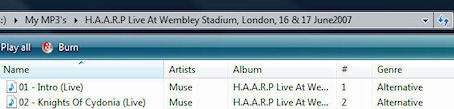
Our selection
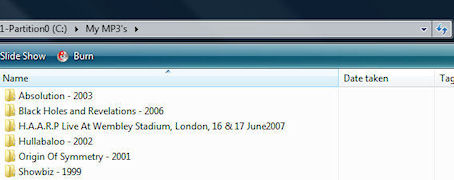
How our albums will be stored as folders.
The final setting is not important, but I find it useful to let me know when Audiograbber has done it's work by ejecting the CD from the PC.
Audiograbber has an audible alert to show that it's completed it's work, but I find the ejecting a quick visual check so I can get on with other things away from the PC while it's ripping.
Go to the 'Misc' tab and select 'Eject the disc after ripping'.
We're done.
We're now ready for our music ...
Go back | Continue to the next page
|
|

